Walkthrough application snapshot
1. Introduction
Before reading this introduction, please read the About Buoy document, if it is not already the case.
The purpose of the resources found in this site is to offer Buoy sample codes and tutorials in order to 'get started'. I do not claim that there is only one way to get things done, and presumably some other ways than those shown here may be better. This being said, what is the benefit of using Buoy on a practical, everyday life, basis ?
Bear in mind that Buoy is built on top of Swing. This means that you will get the same "look and feel" as Swing, and from the user's point of view, there isn't any difference between Buoy and Swing. From the programmer's point of view, the difference is however really important. Here are, in my opinion, some practical advantages of Buoy over Swing:
The XML description of an interface is also one of the characteristics of Buoy and indeed a GUI Builder (e.g. Balise ;) ) can make advantage of this feature. The interface definition file is loaded at run time, resulting in a lighter and cleaner code.
Since Buoy is built on top of Swing, it is always possible to refer to the underlying Swing component and do whatever you think cannot be done using Buoy alone. Bear in mind, however, that this is generally a bad idea when learning Buoy. In such a case, what usually happens is that since you don't know Buoy very well, you displace the problem to solve onto the Swing component. The resulting code is generally not very easy to read and may be buggy because you're doing things 'behind Buoy's back'. Generally and unless you're doing something exotic, there is a 'Buoy only' solution.
Now, here is in a few lines what Buoy is about. Buttons, checkboxes, menus, etc. are called Widgets. Some Widgets may contain -layout- other Widgets and hence are called Widget containers. Widgets' properties are set or known using getters and setters. Children widgets are added to a Widget container using an add method. A Widget generates one or several kinds of event categories when the user interacts with it. These events are directly linked to methods using a flexible mechanism (more about this later).This (not so) limited knowledge of Buoy is all there is to know to follow the walkthrough below.
The subject of this walkthrough will be the BorderContainer tutorial. This widget container is a very common one and it is similar to its AWT layout alter ego, BorderLayout. The main interest of this tutorial will thus lie more in the Buoy construction itself and a few general consideration about containers and layouts than in illustrating this particular widget container.
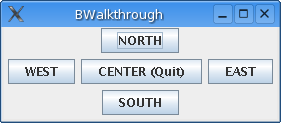
Our aim is to end up with the following sample app : a BorderContainer having a button in each location, with the center button allowing to quit the application:
Walkthrough application
snapshot
The corresponding code is fairly small, so it is reproduced below. It can also be downloaded through this link.
The BWalkthrough class represents a window. With Swing, you would have used a JFrame. Many Swing/AWT components are used as an 'as is' basis for Buoy Widgets, which are in this case wrappers around the corresponding components. The widget name is the same as the component name, except for the 'B' in front of it. Here, the JFrame 'becomes' a BFrame, so the BWalkthrough class subclasses BFrame. The first line of the BWalkthrough constructor is to create a BFrame titled "BWalkthrough":
super( "BWalkthrough" );
Afterwards, we need to create the "BorderLayout". With Buoy , there is no such thing as a layout manager. There are widget containers which lay out child widgets in different ways. For example, a BorderContainer is a widget container which has five locations, each of one able to hold a child widget. The first step is thus to create a BorderContainer widget:
The next (optional) step is to set the default layout for all of the BorderContainer 'slots'. Quoting the API documentation "A LayoutInfo object contains information about how a Widget should be layed out within the space provided by its WidgetContainer", which is not to be mistaken with the layout notion used by Swing components. Here, the layout info specifies if the Widget is to be expanded to fill the whole of the BorderContainer slot it is in, if it is to be aligned left or right, etc. Have a look to the LayoutInfo constructor definition to see what its parameters are about, or (better ;-) ) see the LayoutInfo section.
Widget containers do have a default layout, but it is generally nicer to specify one if only to avoid widgets 'touching' each other because of default (0,0,0,0) insets. Another advantage of specifying a default layout is that the widget layout is not subject to possible future modifications of the "default default layout". The code setting the default layout for the BorderContainer goes:
bc.setDefaultLayout( new LayoutInfo( LayoutInfo.CENTER,
    LayoutInfo.NONE, new Insets( 3, 3, 3, 3 ), null ) );
A few comments on LayoutInfos:
add( what,
      where, how)
, rather than add( what, where), where
how is the LayoutInfo instance.layout = new
LayoutInfo( LayoutInfo.CENTER, LayoutInfo.NONE, new Insets( 3, 3, 3, 3
), null ) );
bc.add( new BButton( "AButton" ),
BorderContainer.NORTH, layout
);
layout.setAlignment(LayoutInfo.WEST);
bc.add( new BButton(
"AnotherButton" ), BorderContainer.SOUTH, layout );
In this
case, the layout of the NORTH location of the border container is also
affected by the assignment layout.setAlignment( LayoutInfo.WEST
) since both of the NORTH and SOUTH slots share the same
LayoutInfo instance. The correct code is thus:layout = new
LayoutInfo( LayoutInfo.CENTER, LayoutInfo.NONE, new Insets( 3, 3, 3, 3
), null ) );
bc.add( new BButton( "AButton" ),
BorderContainer.NORTH, layout );
layout = new LayoutInfo(
LayoutInfo.WEST, LayoutInfo.NONE, new Insets( 3, 3, 3, 3 ), null )
);
bc.add( new BButton( "AnotherButton" ), BorderContainer.SOUTH,
layout );But let's get back to the code. Four BButtons widgets are added to the BorderContainer, implicitly using the default layout:
bc.add( new BButton( "NORTH" ), BorderContainer.NORTH
    );
bc.add( new BButton( "SOUTH" ), BorderContainer.SOUTH
    );
bc.add( new BButton( "EAST" ), BorderContainer.EAST
    );
bc.add( new BButton( "WEST" ), BorderContainer.WEST );
The center button is created using a local variable so that it might be refered to when adding an event link later on:
BButton centerButton = new BButton( "CENTER (Quit)"
    );
bc.add( centerButton, BorderContainer.CENTER );
The border container is added to the frame using the
setContent method (exactly like with Swing - maybe add would
have been more appropriate for Buoy ?- ).
setContent( bc );
The next line, addEventLink( WindowClosingEvent.class, this,
"doQuit" ), is important. It shows how to respond to a particular
event. The first parameter is the class of the event to respond to. In
this particular case, we want to quit the application if the close button
of the window title bar is selected by the user. Such a selection causes a
WindowClosingEvent to be generated by the relevant BFrame instance. The
next parameter is the object that will handle the event :
WindowClosingEvents will be taken care of by the BWalkthrough instance
(this). The third parameter is the method (or in this case the name of the
method) that is to be called when the event happens. Bear in mind
that:
In our case, we define the doQuit() method. Do we need to
know which WindowClosingEvent event motivated the call to
doQuit() ? Not really, so the doQuit() method
doesn't accept any parameter.
The button at the center of the border container also triggers ending
of the application. BButtons generate CommandEvent events (see API), so
another event link is created for this button. It is also handled by the
BWalkthrough instance and calls the doQuit() method.
Eventually, the pack() and setVisible(true)
calls respectively packs the widget containers and widgets and then makes
the window visible.
Well, writing a Buoy app is as simple as that. The next step is to browse the Widget Tutorial section. It first illustrates the different layouts that are obtained using the relevant widget containers. Some sample code follows which show how to use some specific widgets.
import buoy.event.*;
import buoy.widget.*;
import java.awt.Insets;
import java.awt.Dimension;
public class BWalkthrough
extends BFrame
{
public BWalkthrough()
{
super( "BWalkthrough" );
BorderContainer bc = new BorderContainer();
bc.setDefaultLayout( new LayoutInfo( LayoutInfo.CENTER, LayoutInfo.NONE, new Insets( 3, 3, 3, 3 ), null ) );
bc.add( new BButton( "NORTH" ), BorderContainer.NORTH );
bc.add( new BButton( "SOUTH" ), BorderContainer.SOUTH );
bc.add( new BButton( "EAST" ), BorderContainer.EAST );
bc.add( new BButton( "WEST" ), BorderContainer.WEST );
BButton centerButton = new BButton( "CENTER (Quit)" );
bc.add( centerButton, BorderContainer.CENTER );
setContent( bc );
addEventLink( WindowClosingEvent.class, this, "doQuit" );
centerButton.addEventLink( CommandEvent.class, this, "doQuit" );
pack();
setVisible( true );
}
private void doQuit()
{
System.exit( 0 );
}
public static void main( String[] args )
{
new BWalkthrough();
}
}