The column container stacks its child widgets in a single column, as show below:
It would be very easy to adapt the walkthrough code to illustrate the ColumnContainer widget. However, it is time to display a bit more than a default layout on the demo window. With a single container created in the code, you can only try one LayoutInfo at a time. You have to quit the demo app, modify the code and re-run the app.
A more practical (and educative) way of illustrating how different layout options modify the behavior of a ColumnContainer is to use a tabbed pane and put a different layout in each tab. Each tab will contain a different ColumnContainer example.
The ColumnContainerDemo code is reproduced at the bottom of the page. You can also download the ColumnContainerDemo.java file.
Using a tabbed pane in this context is easy. Once the tabbed pane is created, a widget is added to a new tab using the method :
tabbedPane.add( widget, "tab name");
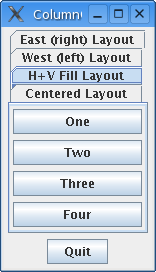
To spice the demo a bit, we will also place a Quit button below the tabbed pane. So the complete layout is as follows:
NORTH Unused WEST unused Tabbed Pane One ColumnContainer per Tab
EAST Unused Quit Button
The constructor code first creates the border container along with an appropriate default layout and a tabbed pane:
 BorderContainer bc = new BorderContainer();
 bc.setDefaultLayout( new LayoutInfo( LayoutInfo.CENTER, LayoutInfo.NONE, new Insets( 3, 3, 3, 3 ), null ) );
 BTabbedPane tabbedPane = new BTabbedPane();
As many column containers as needed are then created using the sequence:
 ColumnContainer cc = new ColumnContainer();
 cc.setDefaultLayout( new LayoutInfo( LayoutInfo.CENTER, LayoutInfo.NONE, new Insets( 3, 3, 3, 3 ), null ) );
 cc.add( new BButton( "One" ) );
 cc.add( new BButton( "Two" ) );
 cc.add( new BButton( "Three" ) );
 cc.add( new BButton( "Four" ) );
 tabbedPane.add( cc, "Centered Layout" );
Each column container is added to the tabbed pane in a new tab. The default layout of each column container is defined as follows:
Eventually, the tabbed pane and quit button are added to the border container:
 bc.add( tabbedPane, BorderContainer.CENTER,
                 new LayoutInfo( LayoutInfo.CENTER, LayoutInfo.BOTH, new Insets( 3, 3, 3, 3 ), null ) );
 bc.add( quitButton, BorderContainer.SOUTH );
 setContent( bc );
If you want the tabbed pane to grow as the window is resized, then the layout fill type of the tabbed pane whithin the border container should correspond to BOTH. For this reason, the default layout is not used when adding the tabbed pane to the border container center and the relevant layout is used.
The following figures illustrate each layout result:
Centered layout
Both horizontal and vertical fill layout
Left alignment layout
Right alignment layout
import buoy.event.*;
 import buoy.widget.*;
 import java.awt.Insets;
 import java.awt.Dimension;

 public class ColumnContainerDemo
          extends BFrame
 {
     public ColumnContainerDemo()
     {
         super( "ColumnContainer Demo" );

         BorderContainer bc = new BorderContainer();
         bc.setDefaultLayout( new LayoutInfo( LayoutInfo.CENTER, LayoutInfo.NONE, new Insets( 3, 3, 3, 3 ), null ) );

         BTabbedPane tabbedPane = new BTabbedPane();

         ColumnContainer cc = new ColumnContainer();
         cc.setDefaultLayout( new LayoutInfo( LayoutInfo.CENTER, LayoutInfo.NONE, new Insets( 3, 3, 3, 3 ), null ) );
         cc.add( new BButton( "One" ) );
         cc.add( new BButton( "Two" ) );
         cc.add( new BButton( "Three" ) );
         cc.add( new BButton( "Four" ) );
         tabbedPane.add( cc, "Centered Layout" );

         cc = new ColumnContainer();
         cc.setDefaultLayout( new LayoutInfo( LayoutInfo.CENTER, LayoutInfo.BOTH, new Insets( 3, 3, 3, 3 ), null ) );
         cc.add( new BButton( "One" ) );
         cc.add( new BButton( "Two" ) );
         cc.add( new BButton( "Three" ) );
         cc.add( new BButton( "Four" ) );
         tabbedPane.add( cc, "H+V Fill Layout" );

         cc = new ColumnContainer();
         cc.setDefaultLayout( new LayoutInfo( LayoutInfo.WEST, LayoutInfo.NONE, new Insets( 3, 3, 3, 3 ), null ) );
         cc.add( new BButton( "One" ) );
         cc.add( new BButton( "Two" ) );
         cc.add( new BButton( "Three" ) );
         cc.add( new BButton( "Four" ) );
         tabbedPane.add( cc, "West (left) Layout" );

         cc = new ColumnContainer();
         cc.setDefaultLayout( new LayoutInfo( LayoutInfo.EAST, LayoutInfo.NONE, new Insets( 3, 3, 3, 3 ), null ) );
         cc.add( new BButton( "One" ) );
         cc.add( new BButton( "Two" ) );
         cc.add( new BButton( "Three" ) );
         cc.add( new BButton( "Four" ) );
         tabbedPane.add( cc, "East (right) Layout" );

         BButton quitButton = new BButton( "Quit" );

         bc.add( tabbedPane, BorderContainer.CENTER,
                 new LayoutInfo( LayoutInfo.CENTER, LayoutInfo.BOTH, new Insets( 3, 3, 3, 3 ), null ) );
         bc.add( quitButton, BorderContainer.SOUTH );
         setContent( bc );

         addEventLink( WindowClosingEvent.class, this, "doQuit" );
         quitButton.addEventLink( CommandEvent.class, this, "doQuit" );

         pack();
         setVisible( true );

     }


     /**
      *  Quit application
      */
     private void doQuit()
     {
         System.exit( 0 );
     }


     public static void main( String[] args )
     {
         new ColumnContainerDemo();
     }
 }